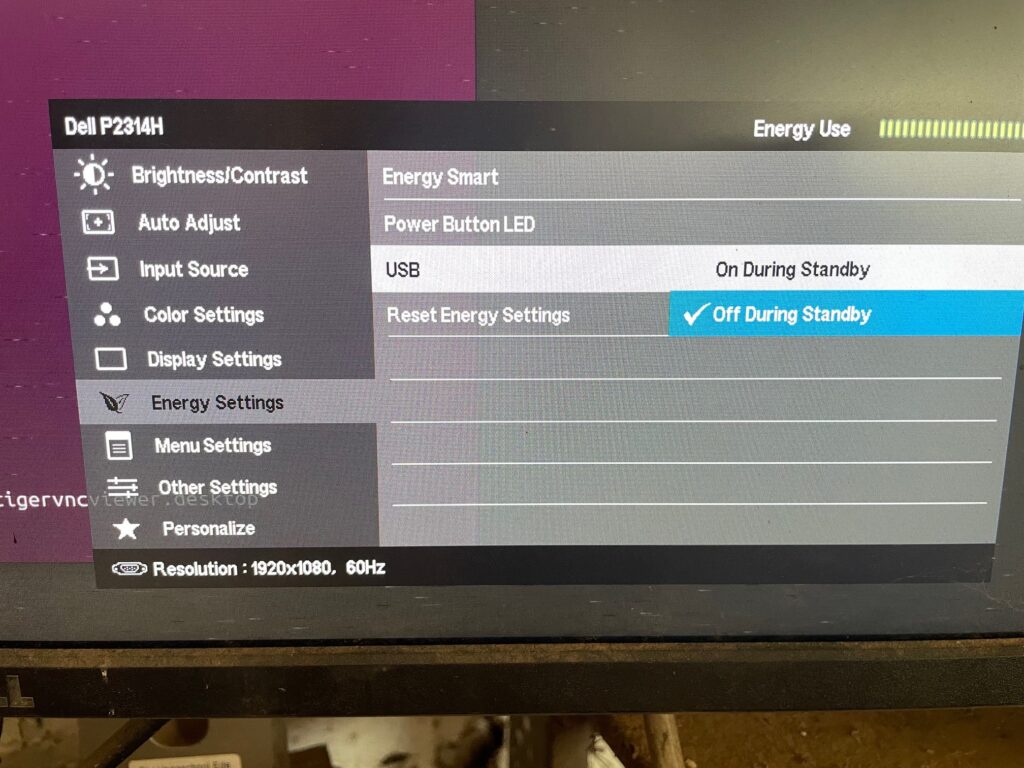
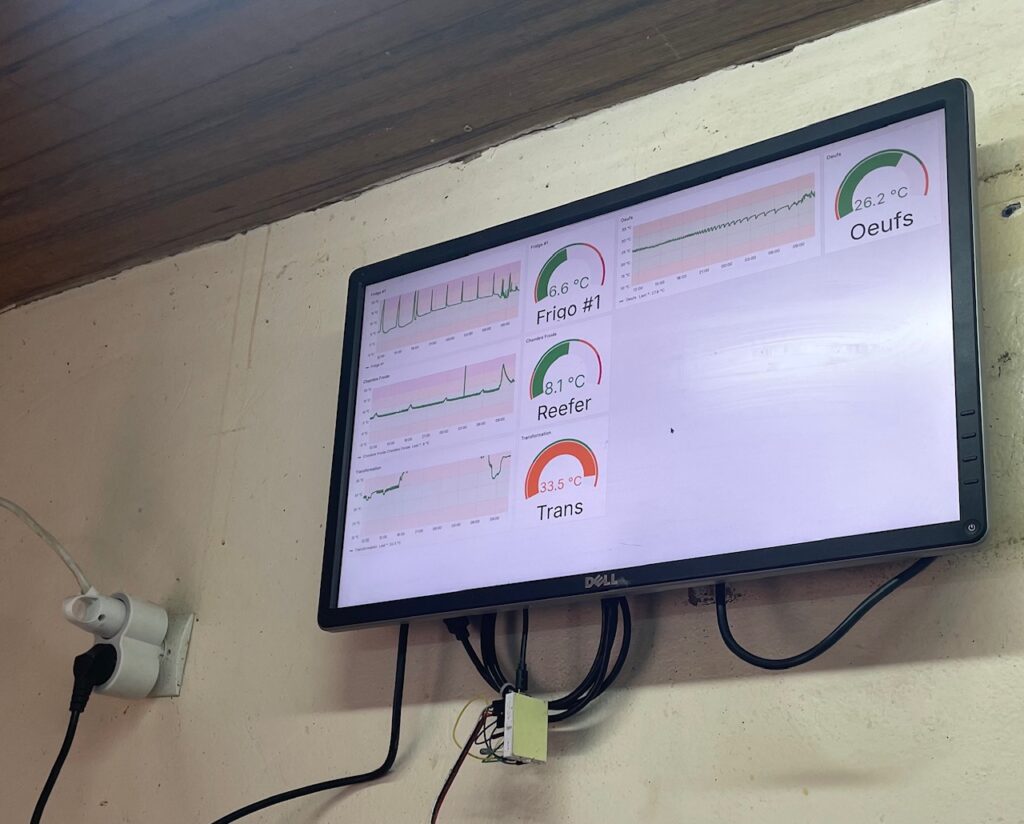
I have a number of places around the farm where I need information displayed so workers can keep track of machine status, temperatures, and power consumption. I have a central server that has a influxdb database and grafana to display the info on various dashboards. The cheapest way I have found to have a live dashboard is using an old computer monitor and a Raspberry Pi Zero 2W. The monitor has USB ports that can power the Raspi, but settings need to be adjusted so they are powered all the time, otherwise if the screen goes into powersave mode, it will cut the Raspi also.
The Raspi is connected via a mini-HDMI adapter -> HDMI cable -> HDMI/DVI-D adapter. Aliexpress sells those adapters for cheap.
The Zero 2W only has 512MB RAM, so does not run a desktop environment very well. It can handle a basic desktop, but trying to load a browser (Chromium) with a heavy website like Grafana would be glacially slow. So I let the server do the heavy lifting and just VNC from the raspberry pi.
The steps to accomplish this are as follows:
- Establish a new user on the server (Debian LXQT) using this guide. Be sure to adjust the VNC session screen resolution to the monitor you are using (in my case 1920×1080).
- VNC into the session you just created.
- Disable xscreensaver in preferences.
- Make firefox start on boot by going to Preferences->LXQt Settings->Session Settings, click on AutoStart, click Add, name it firefix and put
/usr/bin/firefox-esr -kioskin the command spot. - Launch Firefox, arrange the tabs how you want, then go to Settings->Home->Use Current Pages to lock the pages on launch.
- In URL, type about:config, accept the warning and search for
browser.sessionstore.resume_from_crash, double click on true and it will change to false. Do the same forbrowser.sessionstore.max_resumed_crashes, double click the value and change it to 0 (zero).
Now the VNC session is ready for the raspi to connect to it.
On the raspberry pi, load a 32-bit OS from the website or Raspberry Pi Imager. The things that need to happen on the Raspi are:
- Use Display Power Management System commands to turn the screen on and off on a schedule (i.e. off at night) and to prevent the screen from going to sleep (defaults to 10 minutes) because of no mouse movement.
- A script to launch VNC Viewer on boot, using ATBSWP.
- Change windowing system to X11, enable VNC
Create two scripts, screenon.sh and screenoff.sh
sudo nano ~/Desktop/screenon.sh
#!/bin/sh

# Determine execution context
HOUR=$(date +%H)
if [ "$HOUR" = "07" ]; then
    CONTEXT="7am timer"
    TIMEOUT=30  # Short timeout since display should be ready
    SLEEP_INTERVAL=1
else
    CONTEXT="boot"
    TIMEOUT=120  # Longer timeout for boot
    SLEEP_INTERVAL=2
fi

echo "Starting screenon script ($CONTEXT execution)"

# Set DISPLAY environment variable
export DISPLAY=:0
echo "Set DISPLAY to :0"

# Wait for X11 to be available with context-appropriate timeout
ELAPSED=0
echo "Waiting for X11 display to become available..."

while ! xset -display :0 q >/dev/null 2>&1; do
    if [ $ELAPSED -ge $TIMEOUT ]; then
        echo "ERROR: Timeout waiting for X11 display after $TIMEOUT seconds ($CONTEXT)" >&2
        exit 1
    fi

    echo "X11 not ready yet, waiting... (elapsed: ${ELAPSED}s) [$CONTEXT]"
    sleep $SLEEP_INTERVAL
    ELAPSED=$((ELAPSED + SLEEP_INTERVAL))
done

echo "X11 display is now available (waited ${ELAPSED}s) [$CONTEXT]"

# Set DPMS timeouts to maximum (effectively disable screen blanking)
echo "Setting DPMS timeouts to maximum..."
if /usr/bin/xset -display :0 dpms 32767 32767 32767; then
    echo "Successfully set DPMS timeouts"
else
    echo "ERROR: Failed to set DPMS timeouts" >&2
    exit 1
fi

# Force display on
echo "Forcing display on..."
if /usr/bin/xset -display :0 dpms force on; then
    echo "Successfully forced display on"
else
    echo "ERROR: Failed to force display on" >&2
    exit 1
fi

# Verify current DPMS settings
echo "Current DPMS settings:"
/usr/bin/xset -display :0 q | grep -A 5 "DPMS"

echo "Screenon script completed successfully ($CONTEXT)"
exit 0
Change permissions so script can execute sudo chmod 755 ~/Desktop/screenon.sh
sudo nano ~/Desktop/screenoff.sh
#!/bin/sh

echo "Starting screenoff script (5pm execution)"

# Set DISPLAY environment variable
export DISPLAY=:0
echo "Set DISPLAY to :0"

# Quick check if X11 is available (should be at 5pm)
if ! xset -display :0 q >/dev/null 2>&1; then
    echo "ERROR: X11 display not available at 5pm - this is unexpected" >&2
    exit 1
fi

echo "X11 display confirmed available"

# Force display off
echo "Forcing display off..."
if /usr/bin/xset -display :0 dpms force off; then
    echo "Successfully forced display off"
else
    echo "ERROR: Failed to force display off" >&2
    exit 1
fi

echo "Screenoff script completed successfully (5pm)"
exit 0
Change permissions so script can execute sudo chmod 755 ~/Desktop/screenoff.sh
Create service files for screenon.sh and screenoff.sh, and timer files for the timed parts. Note that screenoff.timer has Persistent=true removed so if it fails for some reason it won’t try immediately on startup. For screenon.service WantedBy=graphical.target will make it run on boot to set the DPMS timeouts:
sudo nano /etc/systemd/system/screenon.service
[Unit]
Description=Keep screen on - disable DPMS
After=graphical.target
Wants=graphical.target

[Service]
Type=oneshot
User=pi
Group=pi
Environment=DISPLAY=:0
ExecStart=/home/pi/Desktop/screenon.sh
RemainAfterExit=yes
StandardOutput=journal
StandardError=journal

[Install]
WantedBy=graphical.target
sudo nano /etc/systemd/system/screenon.timer
[Unit]
Description=Run screenon service at 7am daily
Requires=screenon.service

[Timer]
OnCalendar=*-*-* 07:00:00
Persistent=true

[Install]
WantedBy=timers.target
sudo nano /etc/systemd/system/screenoff.service
[Unit]
Description=Turn screen off - force DPMS off
After=graphical.target
Wants=graphical.target

[Service]
Type=oneshot
User=pi
Group=pi
Environment=DISPLAY=:0
ExecStart=/home/pi/Desktop/screenoff.sh
StandardOutput=journal
StandardError=journal
sudo nano /etc/systemd/system/screenoff.timer
[Unit]
Description=Run screenoff service at 5pm daily
Requires=screenoff.service

[Timer]
OnCalendar=*-*-* 17:00:00

[Install]
WantedBy=timers.target
Activate all the services and timers
sudo systemctl daemon-reload
sudo systemctl enable screenon.service
sudo systemctl enable screenon.timer
sudo systemctl enable screenoff.service
sudo systemctl enable screenoff.timer
sudo systemctl start screenon.timer
sudo systemctl start screenoff.timer
For Automate The Boring Stuff With Python (ATBSWP), VNC into the Raspi, follow the instructions to install it, clear the desktop like it will look at bootup, then launch it with python3 atbswp/atbswp.py and then push record. Click the terminal icon up top, type in vncviewer 192.168.3.98:5904 -Fullscreen -ColorLevel Full -Scaling 1920x1080 (adjusting values as appropriate), press enter, type the password, press enter, then push the stop button.
This will create the script that you can adjust to remove mouse movements, reduce delays and increase delays as necessary (since the Raspi is often slow starting up). Here is my script:
#!/bin/env python3
# Created by atbswp v0.3.1 (https://git.sr.ht/~rmpr/atbswp)
# on 30 Nov 2024
import pyautogui
import time
pyautogui.FAILSAFE = False

time.sleep(10.0)
pyautogui.mouseDown(152, 15, 'left')
pyautogui.mouseUp(152, 15, 'left')
time.sleep(3.0)
pyautogui.write('vncviewer 192.168.3.98:5904 -Fullscreen -ColorLevel Full -Scaling 1920x1080')
time.sleep(0.2)
pyautogui.press('enter')
time.sleep(25)
pyautogui.write('password')
pyautogui.press('enter')
To make that script launch at startup, you can use a few different methods, like systemd, crontab or the obscure method I found, editing a file named autostart in the ~/.config/lxsession/LXDE-pi folder with the following line added.
sudo nano ~/.config/lxsession/LXDE-pi/autostart
@lxterminal -e /home/pi/Desktop/boot.shThe file should look like
@lxpanel --profile LXDE-pi
@pcmanfm --desktop --profile LXDE-pi
@xscreensaver -no-splash
@point-rpi
@lxterminal -e /home/pi/Desktop/boot.sh
boot.sh is a bash script that just calls the python ATBSWP script.
#!/bin/sh
/usr/bin/python3 /home/pi/Desktop/launchvncsession
exit 0
Next step is to make boot.sh executable
sudo chmod 755 /home/pi/Desktop/boot.sh
Next step, change to X11 windowing environment
sudo raspi-config
choose Advanced Options, then A6 Wayland, then W1 X11
If you want to enable VNC access so you can troubleshoot, chooseInterface Options, then I3 VNC